Blender FBX Pipeline
This document discusses Blender specific FBX pipeline issues. The UE4 FBX pipeline in general is covered by Epic's documentation in FBX Content Pipeline. FBX files can be used to exchange data both...
This document discusses Blender specific FBX pipeline issues. The UE4 FBX pipeline in general is covered by Epic's documentation in FBX Content Pipeline. FBX files can be used to exchange data both ways: from Blender to UE4 and from UE4 to Blender.
Background
The most supported FBX pipeline is Maya->FBX->UE4. Maya, FBX, and UE4 all use centimeters for their unit. Blender, however, uses meters. This leads to issues where the scale of objects is off by a factor of 100. For example, animations are sometimes scaled down by 0.01 and SOCKET_ empties scaled up by 100.
FBX does not have a public specification, only an SDK developed by Audodesk. Because of this, Blender implements it's own reverse engineered version of the FBX SDK, and it has bugs. FBX allows exporters to define many properties, like the coordinate system, which makes it more complicated to implement an importer correctly. There is a lot of room for divergence between various importers and exporters.
Many of these FBX have been resolved by the glTF export format, which, while superior for the cases where it does work, does not implement everything the UE4 FBX importer does (animations, collisions, and sockets).
Static Meshes
UE4 can import static meshes with collision geometry and sockets. For details, see FBX Static Mesh Pipeline.
Static Export Methods
There are a few ways to export static meshes from Blender. The options below try to deal with some of the factor of 100 scaling issues that occur due to the mismatch between Blender operating in meters by default and FBX assuming centimeters.
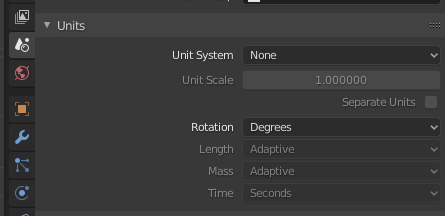
Option 1: Set Units to None/Fake Maya Mode
This option tries to make Blender work like Maya, which is important because you know Epic has optimized the Maya FBX pipeline more than anything. To use it, set Blender's Unit System to None, but model objects like they are in centimeters. When you do this, the Blender FBX exporter will not perform unit conversions.
Option 2: Check !EXPERIMENTAL! Apply Transform
Checking !EXPERIMENTAL! Apply Transform will prevent Blender from applying the global scale to empties (which may be used for sockets).

Option 3: Use a scaling factor of 0.01 on SOCKET_ empties
This just undoes the Blender export scaling. The problem is the socket becomes so small you can't see it anymore in Blender, but you can bump up the visual handle size to compensate.
Skeletal Meshes
Leaf Bones
When exporting from Blender to UE4, uncheck the Add Leaf Bone option in the Blender FBX exporter, otherwise you get an extra and useless bone in the rig.

Import Normals
When importing skeletal meshes, it's important to choose Import Normals from the UE4 FBX Importer. Otherwise, UE4 will compute smooth normals and you will lose any hard edges authored in Blender.
Here is an example of 2 ico spheres, the top smooth shaded and the bottom flat shaded, and an armature in Blender:
Skeletal Mesh with Smooth and Flat Shading.png|Skeletal Mesh with Flat and Smooth Shading Mesh Compute Normals from Blender Authored FBX.png|Result using Compute Normals Mesh Import Normals from Blender Authored FBX.png|Result using Import Normals
Armature Name
When adding an armature, Blender will name the object Armature by default. UE4's FBX importer looks for an object named Armature and will remove it so that you don't have an extra bone in your skeleton in Unreal. This behavior was added in UE 4.16.
However, the automatic bone removal can lead to scaling problems when importing animations. If you want to the automatic Armature bone removal in the UE4 import, then rename Armature to something else, like Root.

This is also mentioned by Blender to Unreal Engine with Matt Workman.
Batch Exporting
Here’s a way to exporting multiple objects from a single .blend file:
- Put each model into a separate collection in the scene.
- Give the render geometry in each collection the name you want it to be in UE4 (for example, SM_MyMesh).
- Put the Collision Geometry in each collection with proper naming (see Collision Geometry).
- When exporting, leave the output filename blank, set the Batch Mode to Collection, and uncheck the Batch Own Dir icon (to avoid creating extra levels of directories).
See Also
- FBX - Blender Manual
- Blender FBX Exporter Source Code
- FBX Content Pipeline - UE4 Documentation
- UE4 FBX Importer Source Code
- Blender FBX Known issues & TODO's
- UE4 Blender Example Project - demonstrates skeletal and static meshes, animations, mannequin animations, and using Blender to blockout levels